Sourdough Baguettes
This Sourdough Baguette Recipe produces two artisan loaves with a crisp crust and light, chewy crumb. The recipe takes more than 12 hours, but the vast majority of the time is hands-off.

I think that this recipe for crusty baguettes is reason enough for making a sourdough starter.
Because the loaves freezes really well, I often make a pair of baguettes each time I need to feed my sourdough starter.
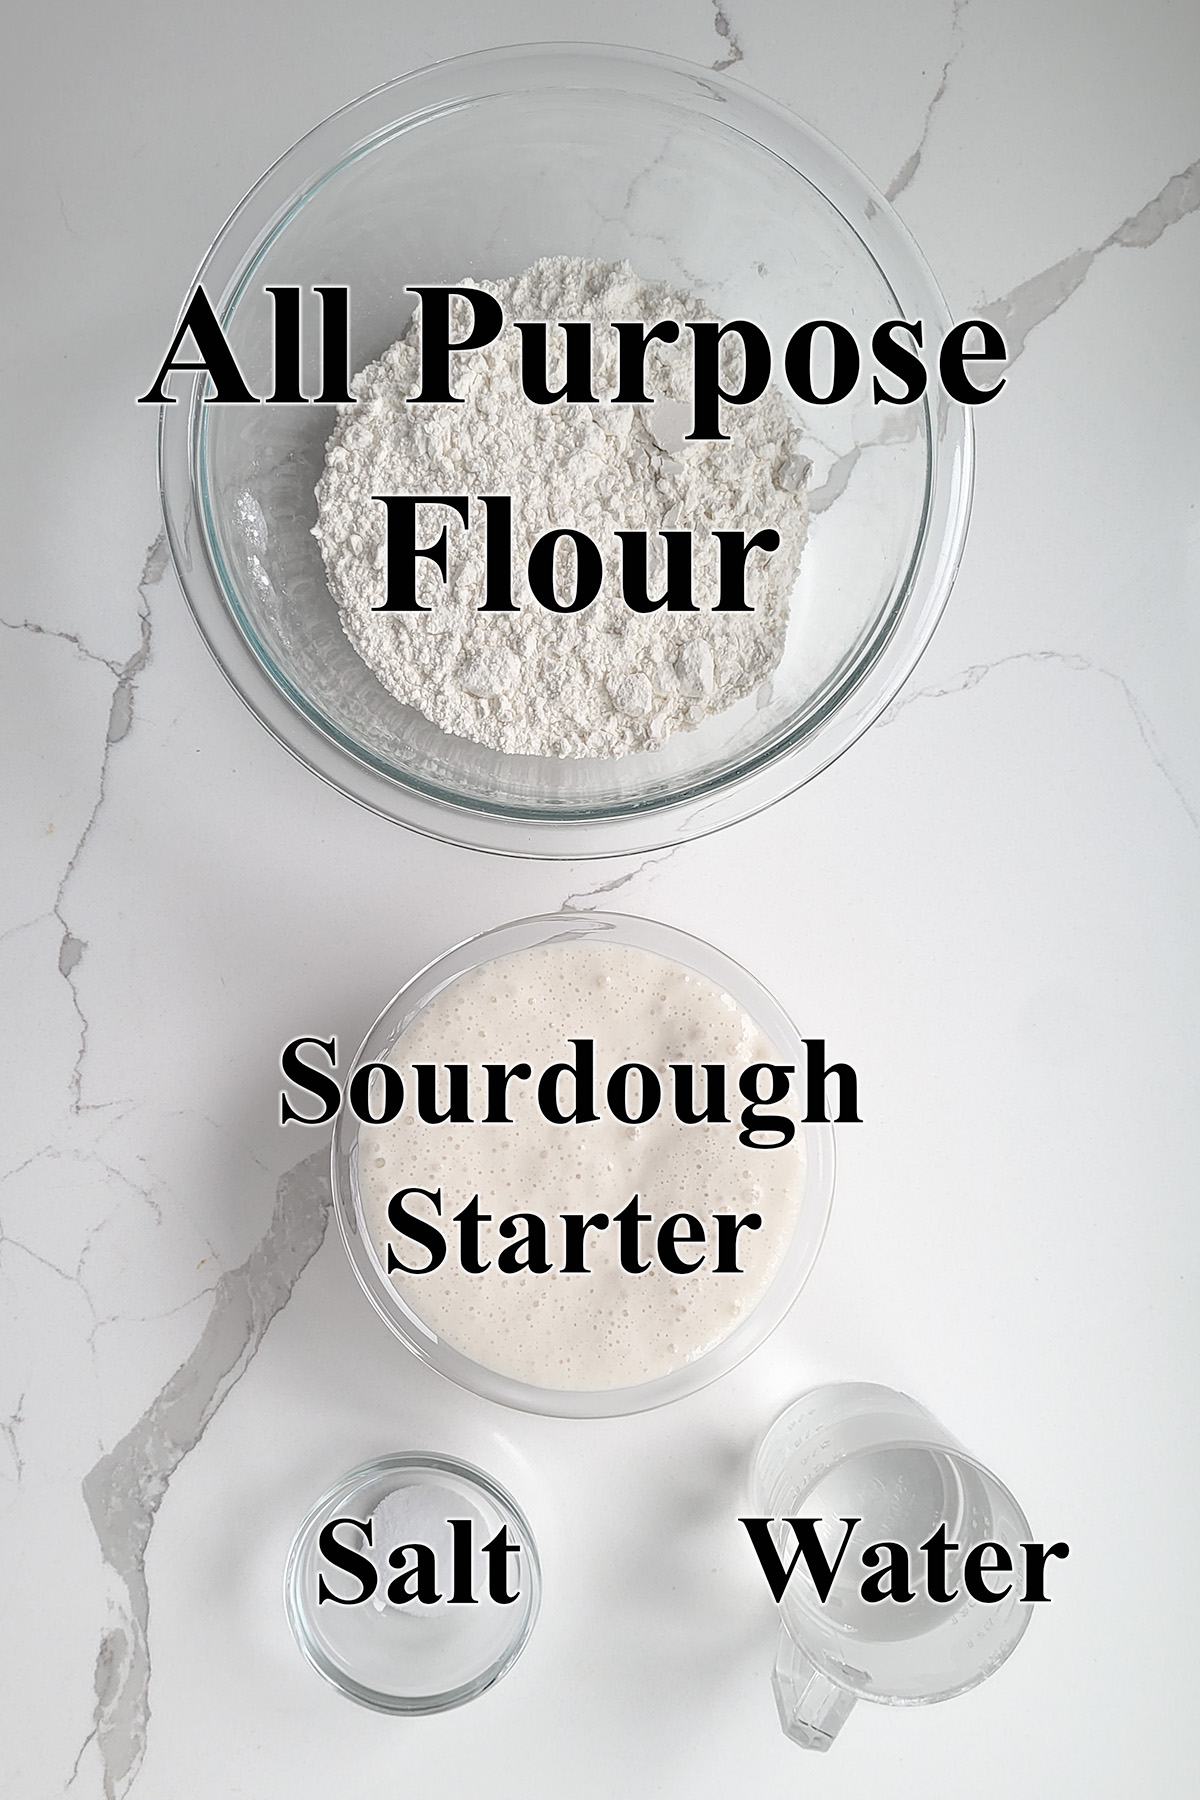
Ingredients
Process photos
See the recipe card for detailed measurements and instructions.
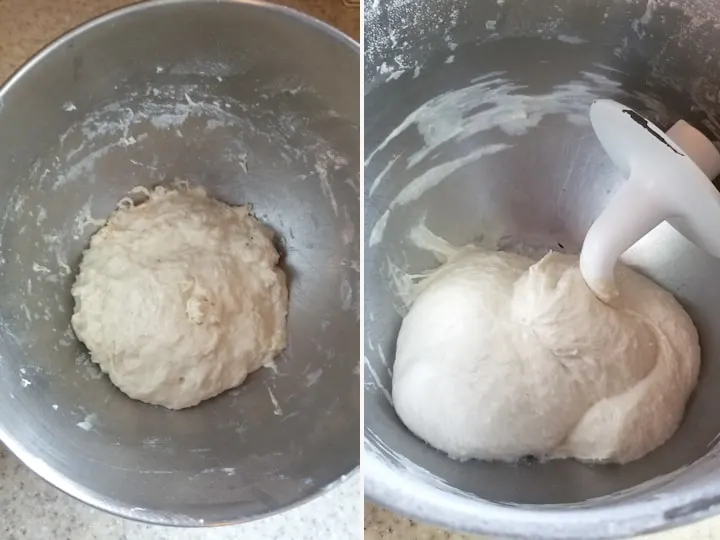
- Combine the starter with the water and some flour and set aside for 30 minutes.
- Finish mixing the dough and knead for 5 minutes.
- The dough will gather on the hook and clear the sides of the bowl.
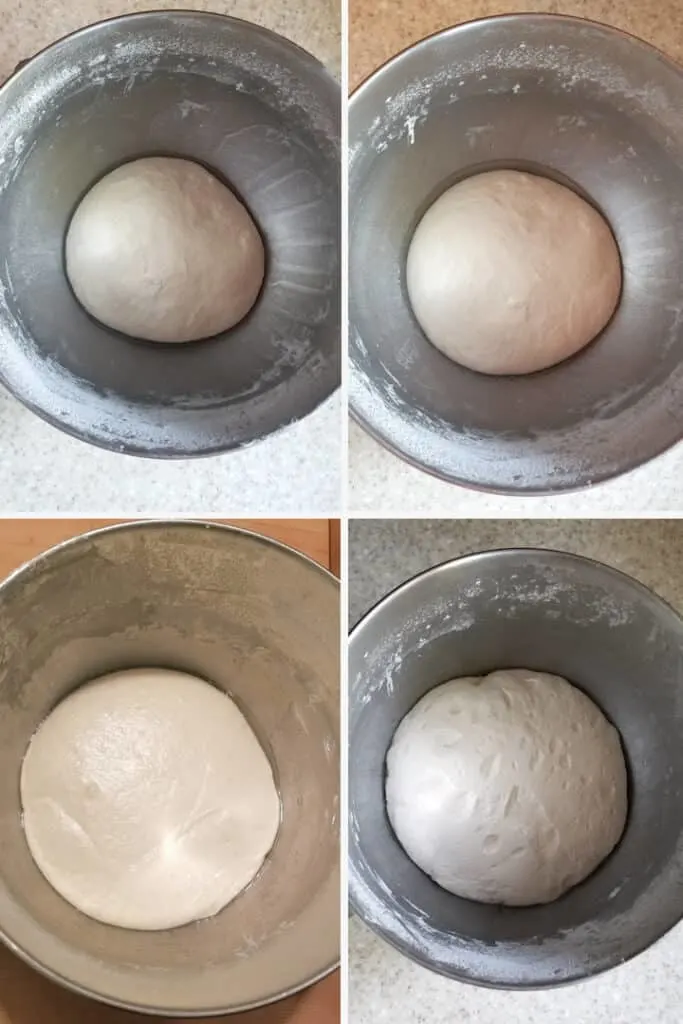
- Set the dough aside to ferment for 3 hours.
- Every hour fold the sides of the dough towards the center to redistribute the yeast and develop the gluten.
- If the dough is not active, aerated and lively after 3 hours give it another hour or two at room temperature.
- After the initial fermentation cover the bowl and put it in the refrigerator overnight. At this point the dough can be held in the refrigerator for up to 2 days.
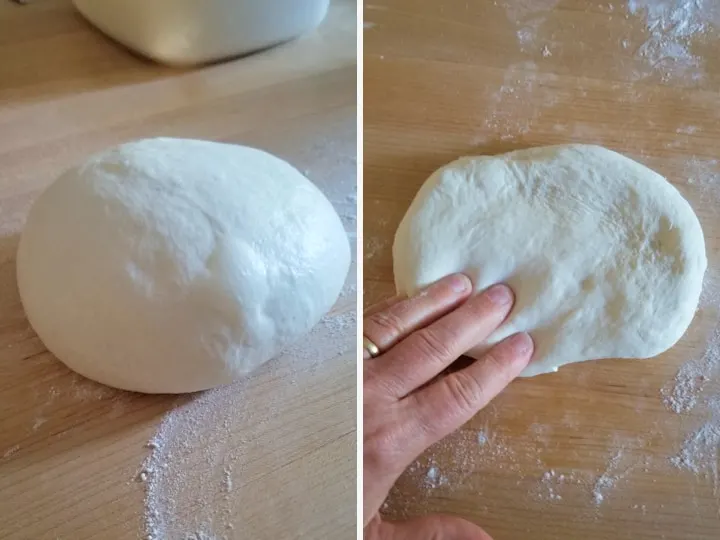
- To shape the baguettes, divide the dough into 2 pieces.
- On a well-floured surface, pat each piece into an oval.
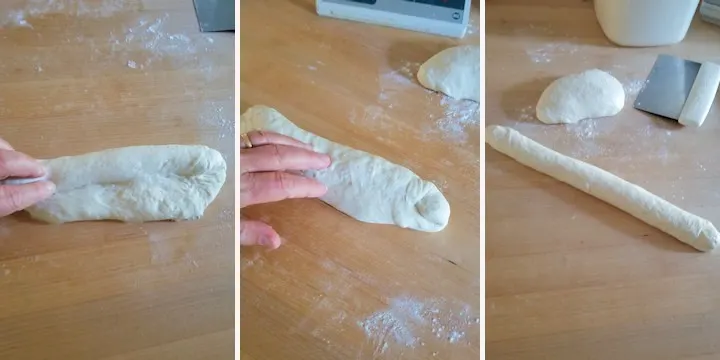
- Roll the dough like a jelly roll.
- Pinch the seam to close.
- Roll the dough to a 16″ long baguette.
- Repeat with the other piece of dough and place the loaves into a baguette pan or baking sheet sprinkled with cornmeal.
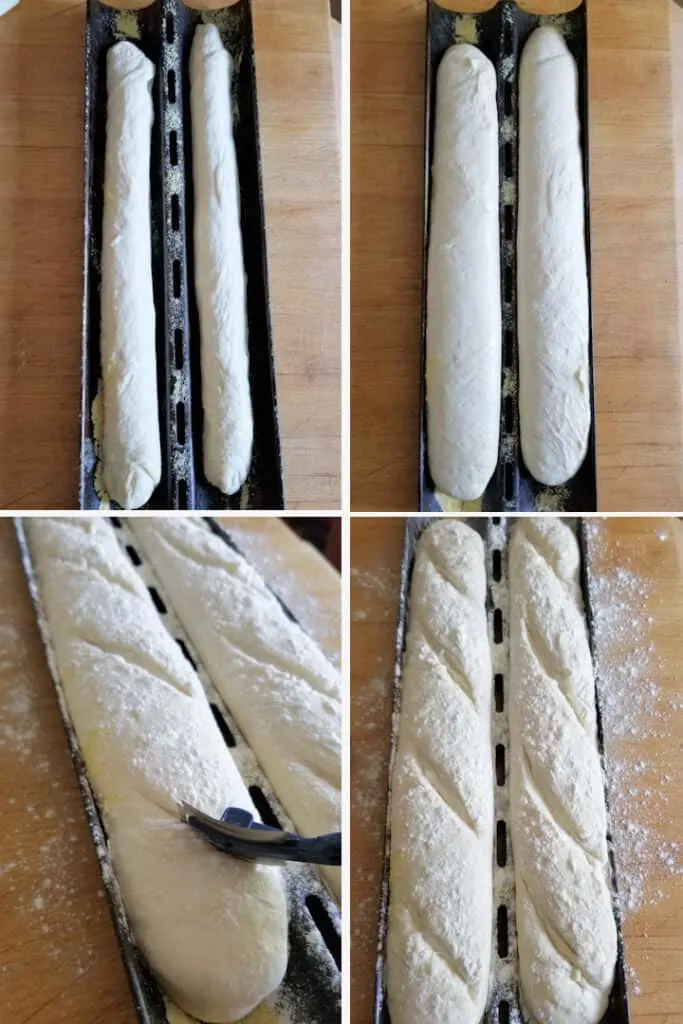
- Cover the pan with a damp towel and set aside until the dough is doubled in size.
- Dust the surface of the loaves with flour and cut 4 slashes into each loaf.

- Bake until well browned.
- Cool on a wire rack.
A timeline for making Sourdough Baguettes:
- If your starter needs feeding, do that the night before or early in the morning of the day you want to make the dough.
- Mix the dough in the afternoon. Allow it to ferment at room temperature all day and refrigerate the dough in the evening before going to bed. The dough can stay in the refrigerator for 2-3 days at this point.
- Take the dough out of the refrigerator and shape the baguettes.
- Leave them at room temperature to rise for 1 1/2- 2 hours.
Storage
Sourdough baguettes are best the day they are baked. The baked loaves can be frozen for up to a month. Defrost and warm in the oven before serving.


I know you hate to throw away that sourdough discard. Check out these recipes that use sourdough discard.
If you love this recipe as much as I do, I’d really appreciate a star rating and a quick comment. Ratings and comments help my recipes show in search results. Thanks!
Sourdough Baguettes
Ingredients
- 8 oz active sourdough starter (1 cup, 100% hydration)
- 4 oz warm water (½ cup)
- 7 ½ oz unbleached all purpose flour (1 ½ cups, see note)
- 1 teaspoon table salt
Instructions
- Combine 8 oz active sourdough starter, 4 oz warm water and 1 cup of the flour. Mix with the paddle on low speed until it forms a wet dough. Cover the bowl and set aside for 30-60 minutes.
- If using a stand mixer, change to the dough hook. Add 1 teaspoon table salt and the rest of the flour and mix until the dough begins to form a ball around the hook. Knead the dough for 5 minutes on medium high speed. If mixing by hand, add the flour using a wooden spoon and/or a plastic bowl scraper. This dough is quite sticky so if you are mixing by hand you can skip the kneading step for a "no knead" bread.
- Place the dough into a lightly oiled bowl, turn once to coat the dough. Cover the bowl and set it aside at room temperature.
- After 30 minutes uncover the bowl, lift one side of the dough and fold it into the middle of the dough. Repeat with the other three sides of the dough then flip the dough over. You're basically turning the dough inside-out to redistribute the yeast. Cover the bowl and every 60 minutes repeat the procedure again.
- After about 3 hours the dough should be lively, elastic and airy. If the dough is still sluggish give it another hour or two at room temperature. Cover tightly and refrigerate overnight or proceed with forming the baguettes to bake the same day.
- Sprinkle a baking sheet or baguette pan generously with cornmeal. If you will bake on a baking stone use a baking peel or use the back of a baking sheet so you can transfer the bread to the baking stone.
- Remove the dough from the refrigerator and dump it onto floured surface. Cut the dough into two pieces. Gently stretch each piece of dough into a 8” x 4” oval. Tightly roll like a jellyroll then use flat hands to roll the dough from the center out to form a 16” long baguette.
- Place the two loaves side by side onto the baking sheet or into the baguette pan. Cover with a damp kitchen towel and set aside to rise until almost doubled in size, about 1 – 3 hours. The rising time will vary depending if the dough is cold from a night in the refrigerator.
- Meanwhile, preheat the oven to 475 °F. If you have a baking stone put it in the oven to preheat. Place a shallow pan on the bottom of the oven to preheat. Just before putting the bread in the oven, pour a ½ cup of hot water into the pan on the bottom of the oven and shut the door to capture the steam.
- Sprinkle the tops of the baguettes with flour. Use a very sharp knife or razor to make 3-4 diagonal slashes on top of each loaf. Bake until deeply browned and if you tap on the bottom of a loaf it sounds hollow, about 15-20 minutes. The interior temperature should be 200°F.
- Transfer the loaves to a cooling rack and cool to room temperature before slicing.
Would you like to save this recipe?
Equipment
As an Amazon Associate and member of other affiliate programs, I earn from qualifying purchases.


Absolutely delicious! Best baguette I’ve ever made! I am a fairly new sourdough baker and have a baguette pan with 3 troughs. I want to make this again but produce 3 baguettes instead of 2. Would I simply add half again of each ingredient in the recipe? That seems to make sense but not sure when it comes to sour dough. I also used bread flour instead of AP (didn’t have AP) so I increased the water a little. Again, so much flavor here!! Try this you won’t be sorry!
Yes, you could do 1.5X the recipe.
Easy and turned out perfectly. Baked 6 hours ago and I have to do another batch because the family ate both already
this was my second time making baguettes. first time they looked great but were so hard you could hammer a nail with them. so, I saw this recipe and tried it.
GREAT
pretty much followed the recipe to a tee. I’ve made sourdough bread before but not baguettes. very simple recipe. I just took them out of the oven less than an hour ago. broke a piece off and just as described. crispy on the outside and chewy on the inside. If I didn’t have leftover lasagna dinner would have been the bread and a bottle of wine. well, maybe some cheese.
I can’t see how it could be easier or taste better. I will be making this from now on.
thank you for the recipe.
john
Hi Eileen, I would love to know how you freeze the baguettes, baked, or parbaked?
I freeze them baked. After defrosting just a few minutes in a low oven and they’ll be almost like fresh baked.
I’m trying this recipe for the first time. BOY IS IT STICKY..I’m on my last 60 minutes, but mine doesn’t seem lively and airy. Still sticky. So I’ll give it 2 hours and then put it in the fridge. I so want to add more flour!
Hope it comes out…
The condition of your dough will depend A LOT on the condition of your starter. I have the best luck with this recipe (which I make quite often) when I use my starter at peak activity.
What do you mean by “peak activity “?
When you feed your starter it rises up and then begins to recede. By peak I mean using it when it is fully risen or just beginning to recede. If you use your starter a lot you probably have a good handle on how it activates after feeding.
What do you think about using this recipe for one rustic Italian loaf?
Sure, you could shape it into a boule instead of baguette.
Thank you for posting this recipe. It will be my first attempt at bread making without a bread machine and using SS made from scratch. My starter will be 23 days old tomorrow. I made two kinds, one that is WW and one that is combined, bread flour 50gr, T55 French WW 40gr, KAWW 10 gr. My question is can I use the T55 for the baguettes and if so, how will it affect your recipe? What changes should I make?
I’m not familiar with T55 so I couldn’t say. I use King Arthur AP flour which is 11/7% protein. Any white flour really should work for this recipe (except cake flour). You may need to adjust the flour up or down depending on the protein percent in your flour. If you’re using whole wheat flour you may also have to adjust the flour a bit.
Fastest (ie: shortest time start to finish)simplest recipe w the BEST results!
NO more researching best baguette recipes -TY!
I feel so silly asking this as I have “googled” numerous times how to make breads once starter is mature. Do I use the “discard” to make bread? if so, can I only make bread on the days I discard? I see recipes for 1 cup of starter. If I use 1 cup, again, is it only on the days I feed the starter? Seems like there is lots of information on the net about starting sour dough, but not much about how to manage. thank you in advance.
Visit this post to see how to feed and maintain your starter.
Loved this recipe. Bread is light and pillowy with crisp crust. Not sure how to leave a photo but I have pics of the loaves and a “crumb” pic. Thanks, definitely easy and delish!
Hi Maria, if you’re on social media you can post a photos and tag me.
I’m making these for the second time today, they turned out perfectly the first time, I can’t wait to eat them for dinner tonight!
I read a lot of comments about this recipe not working, but it worked great for me! I fed my starter about 4 hours before making this dough. My kitchen was probably 75 degrees so the starter got active very quickly. I got 2 beautifully-brown loaves from the steaming. My score marks were too shallow.
The ratio of flour to starter seems quite small. This is not much flour to make 2 loaves
The loaves are quite thin so it’s actually not a lot of dough.
I will be trying this recipe soon as most recipes call for starter and a little yeast. I like that this one doesn’t. Is the 224 of starter grams?
Thank you,
SL
Yes, that is grams. Thanks for letting me know. It’s been fixed.
Hi. I’ve been working with sourdough for years, and have made baguettes before. I made your pita bread recipe which came out beautifully!
For some reason these never rose. It didn’t feel right from the beginning. Starter was fed the night before. .There was no rise at all. Always felt sticky and heavy .
Suggestions please!!!!!
Thank you!
What was your timeline? The starter fed the night before, dough made in the morning, then several hours of fermentation? Did the dough get refrigerated overnight or did you bake the same day?
@Barbara O., I am having the exact same problem. I bake sourdough bread all the time so I am very familiar with the techniques and followed this recipe to the letter…it is just a sticky non rising mess. 🙁
I can’t say what happened, but the dough not rising can’t really be attributed to the recipe. I make these quite frequently and they rise nicely for me. As with all things sourdough, the condition of your starter can drastically change the dough. This recipe does have more starter than many others so the effect will be amplified. As far as the dough being sticky, yes it is a wet dough. The dough is 69% hydration, which is wet but not unmanageable for a sourdough.
Can I use bread flour instead of AP?
Yes. The dough will be a bit stiffer, but it would work fine.
I was used bread flour and it turned out great! My sourdough starter was heavy in whole wheat flour and the bread had a deeper color and a nice chew to it.
Really awesome! It looked too simple to work but it really did. Very happy with the result!
Hi, I want to try making baguettes, but I reasly don’t like cornmeal. Can I just use flour instead, or parchment paper? Do I have to do anything different if I use that,?
Do you have a baguette pan? If so, you could sprinkle it with flour or semolina flour. If you’re using a sheet pan parchment is fine.
I don’t have a baguette pan.
Thank you, I used a flat pizza pan with parchment paper, and it worked perfectly.
OMG, THANK YOU! This is the third recipe I am using to make baguettes amd the ine that FINALLY worked and didn’t take an eternity to make however, I am having trouble with the roll. I did leave it in the fridge for a day and a half and rolled in the morning but the roll came apart despite me teying to seal the seams. I don’t know if the wearher had anything to do with it (low sixties here) or of I had too much flour on my dough and the layers just didn’t stick?Any chance you have a video on this? Also, do you have a patreon or a paypal account? I want to support as sourdough is becoming a big part of my quarantine hobbies!
My first guess would be that you had a little too much flour on the dough so the roll didn’t stick together. It is a bit tricky, I tend to flour my hands as I’m working with the dough to prevent them from sticking. I also find that if the dough sticks slightly to the surface that helps me in rolling the dough. Thanks for the offer of support. The best way to support would be to turn off your ad blocker if you have one and to continue to visit my website. The ads pay my bills. Also, if you purchase products by clicking on the links provided in the recipe card I get a commission from those sales.
What do you suggest as an alternative to baguette baking pan?
You can bake them on a sheet pan or baking stone sprinkled heavily with cornmeal.