Sourdough Bread Recipe
This basic Sourdough Bread Recipe produces an artisan loaf with a crisp crust and chewy crumb. It is best baked in a Dutch oven, but the recipe is very flexible and adaptable.
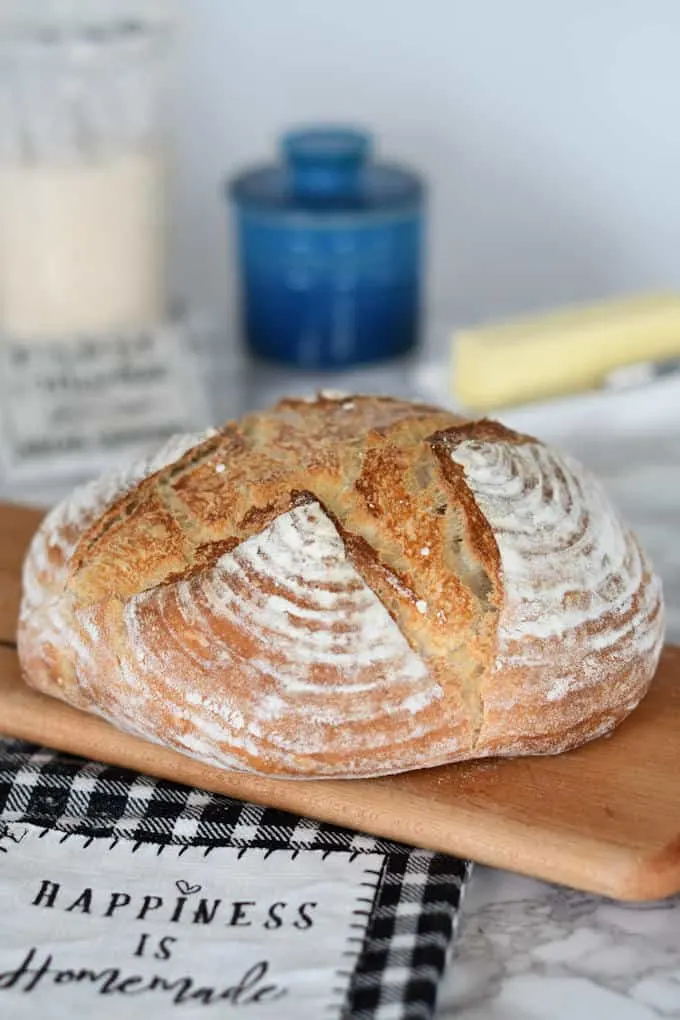
I think that this recipe for crusty sourdough bread is reason enough for making a sourdough starter. The wild yeast in sourdough starter makes an exceptionally delicious loaf of bread.
Because the bread freezes really well, I make a loaf of this Sourdough Bread each time I need to feed my sourdough starter.
What is Sourdough Bread?
Any bread that you make with a sourdough starter is a “sourdough” bread. There are a few key steps that will produce a light, crusty and chewy bread that is the quintessential loaf we all imagine when we hear “artisan sourdough bread ” .
What does the “hydration” percent mean for sourdough starter?
Hydration percent means the ratio of water to flour used for feeding your starter. If you feed your starter with equal weights of flour and water then your starter is 100% hydration. If you feed your starter with twice as much flour as water the hydration level is 50%.
Ingredients
- Active sourdough starter (100% hydration)
- Warm water
- Unbleached all purpose flour
- Salt
How to make Sourdough Bread
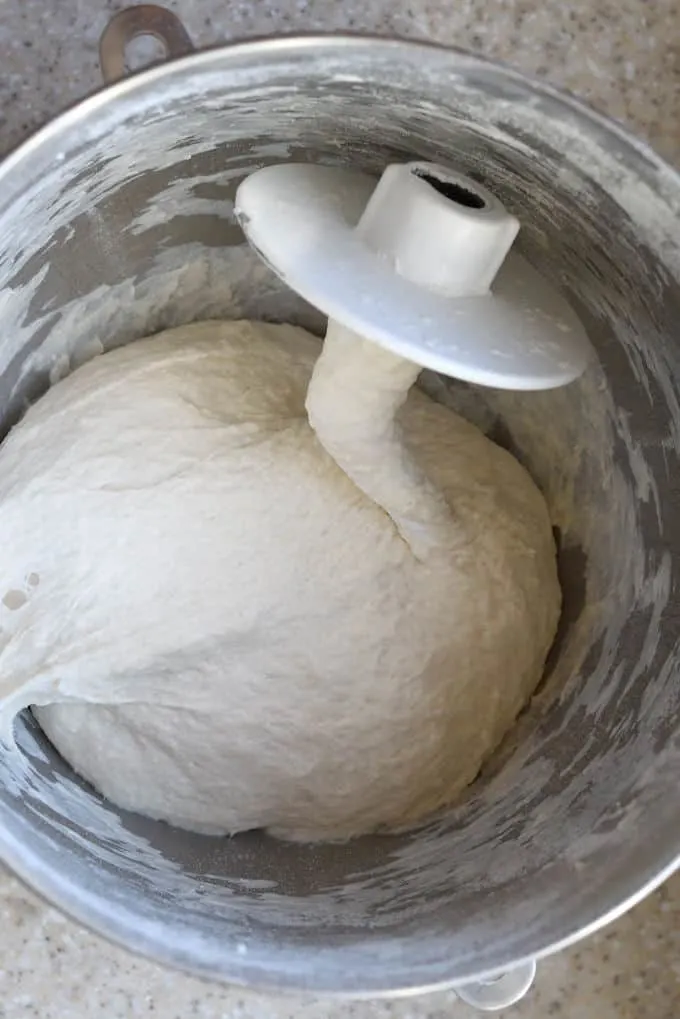
- The dough can be mixed by hand or on a stand mixer.
- The dough starts our quite sticky but will become more cohesive as it ferments.
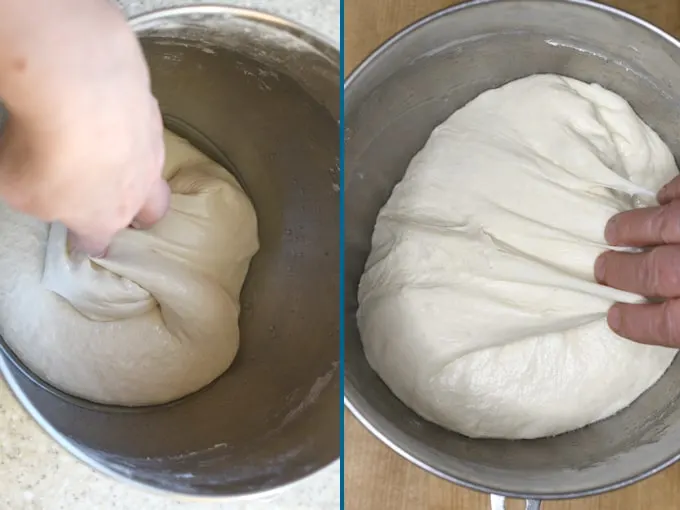
- Stretch and fold the dough several times during the initial fermentation.
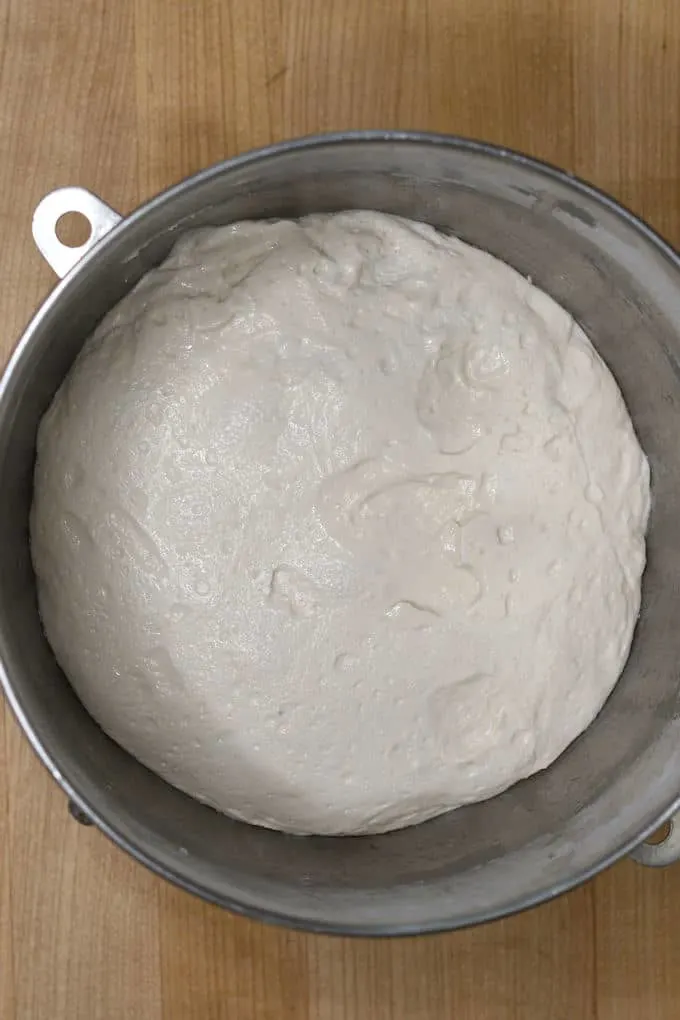
- The dough will become more lively and aerated as it ferments.
- Refrigerate the dough overnight. The dough can be refrigerated for up to 2 days.
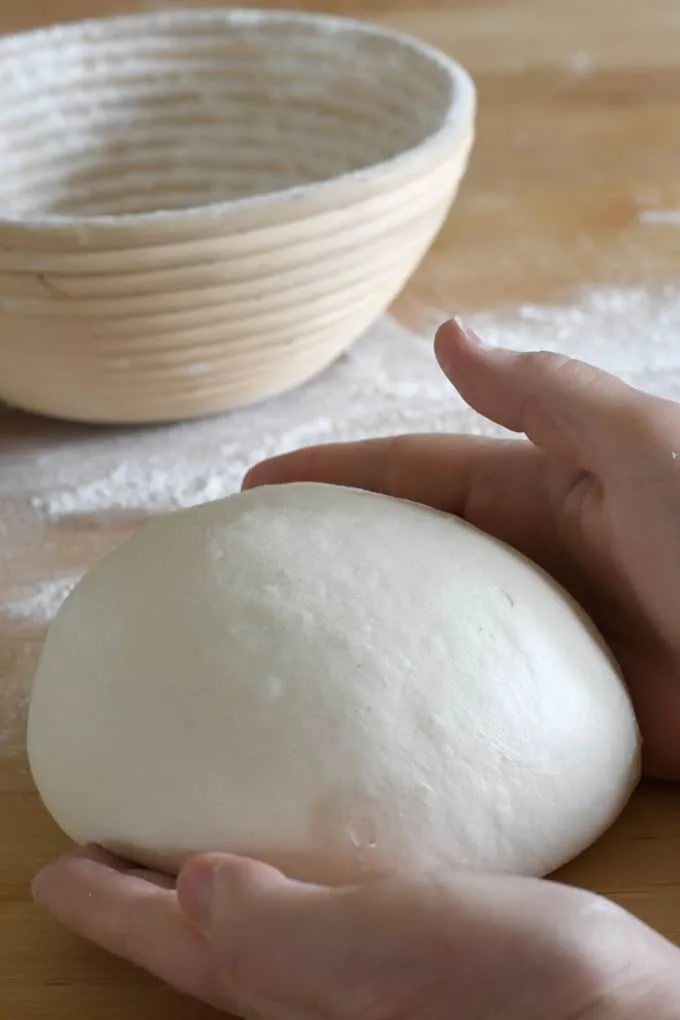
- Turn the dough out onto a lightly floured surface.
- Use cupped hands to form the dough into a smooth ball.
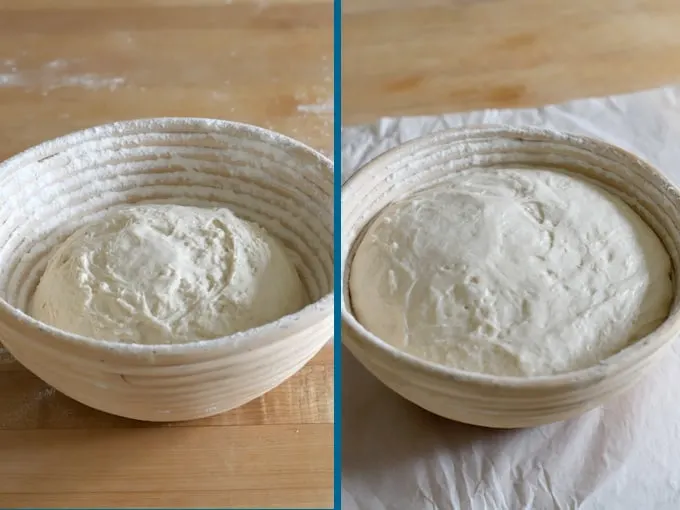
- Set the dough aside to rise for 2-3 hours until it doubles in size. The exact rise time will depend on the temperature of the dough and the ambient temperature.
- If you don’t have a proofing basket you can put the dough directly onto a piece of parchment paper for rising.
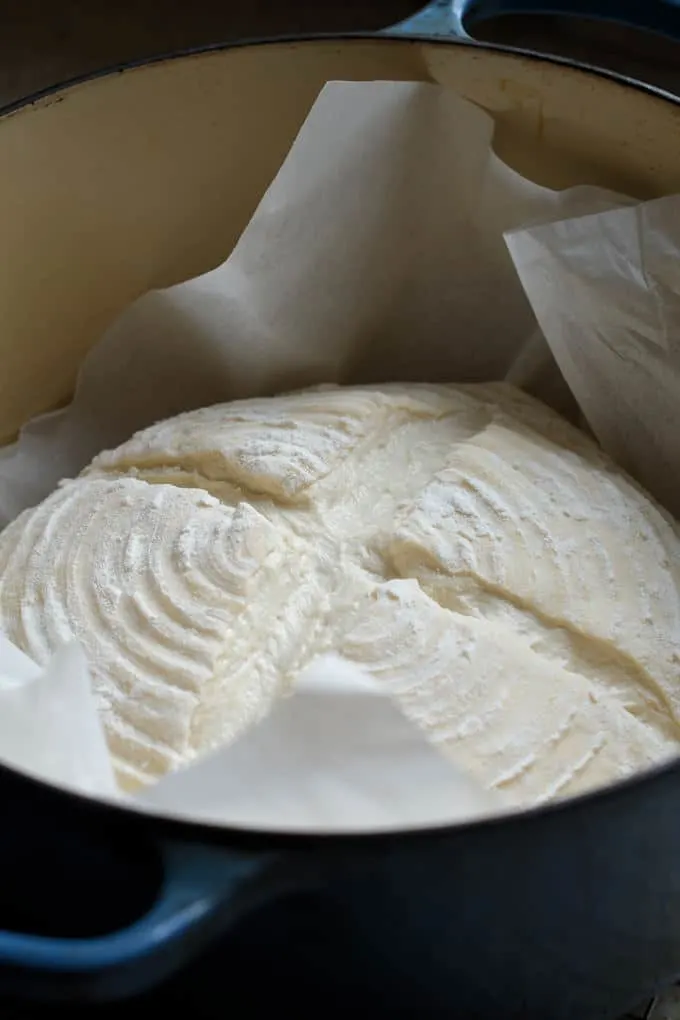
- Flip the loaf onto a piece of parchment paper, score the top, then use the paper to lower the loaf into the preheated Dutch oven.
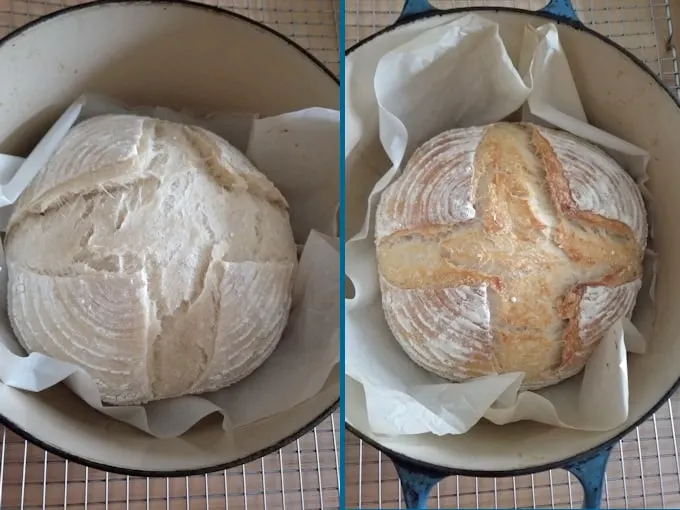
- After 20 minutes baking the loaf is well-risen but still pale.
- Remove the lid and continue baking another 20 minutes until the loaf is golden brown.
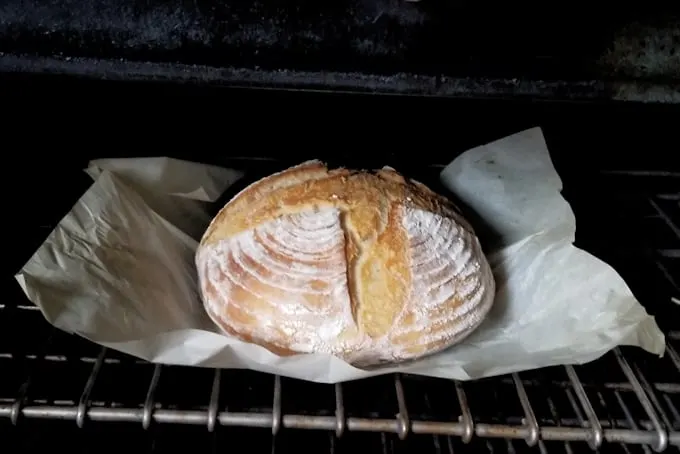
- Remove the loaf from the Dutch oven.
- If the crust is not quite brown enough you can return the loaf to the oven to finish baking until deeply golden brown and very crisp.
Timeline for making sourdough bread:
- If your starter needs feeding, do that the night before or early in the morning of the day you want to make the dough.
- Mix the dough in the afternoon. Allow it to ferment at room temperature all day and refrigerate the dough in the evening before going to bed.
- The dough can stay in the refrigerator for 2-3 days at this point.
- Take the dough out first thing in the morning and shape the loaf.
- Leave the loaf at room temperature to rise for 1 1/2- 2 hours.
- You should have fresh bread by lunch time.
Pastry Chef tips for making artisan Sourdough Bread at home
- A wet dough is a sticky dough and can be a bit fussy to handle. Because this bread has a long, slow fermentation, the bread has time to develop plenty of gluten without lots of kneading.
- The more lively and active your starter is, the better loaf you’ll produce. Use your starter after it’s been fed and just before it’s reached it’s peak rise.
- If you are working with a starter that is not 100% hydration you’ll need to adjust the amount of flour/water in the dough to allow for the difference.
- The Dutch oven creates a moist environment that develops that thick, crispy crust on the bread. Any oven-safe, heavy pot with a lid will work if you don’t have a Dutch oven.
FAQs for making sourdough bread at home:
Yes, start the dough early in the morning and skip the refrigeration step.
You can proof the dough right on the parchment paper that will go into the Dutch Oven.
Use any heavy, oven-safe pot with a lid, or slide the parchment onto a sheet pan to bake. The crust might not be quite as crisp as it is when baked in a Dutch oven.
You could try and shape this dough into a baguette. But I suggest you try this recipe for Sourdough Baguettes instead.
The bread keeps for 2-3 days at room temperature.
Yes! Store the loaf or slices in a freezer bag for up to 3 months.
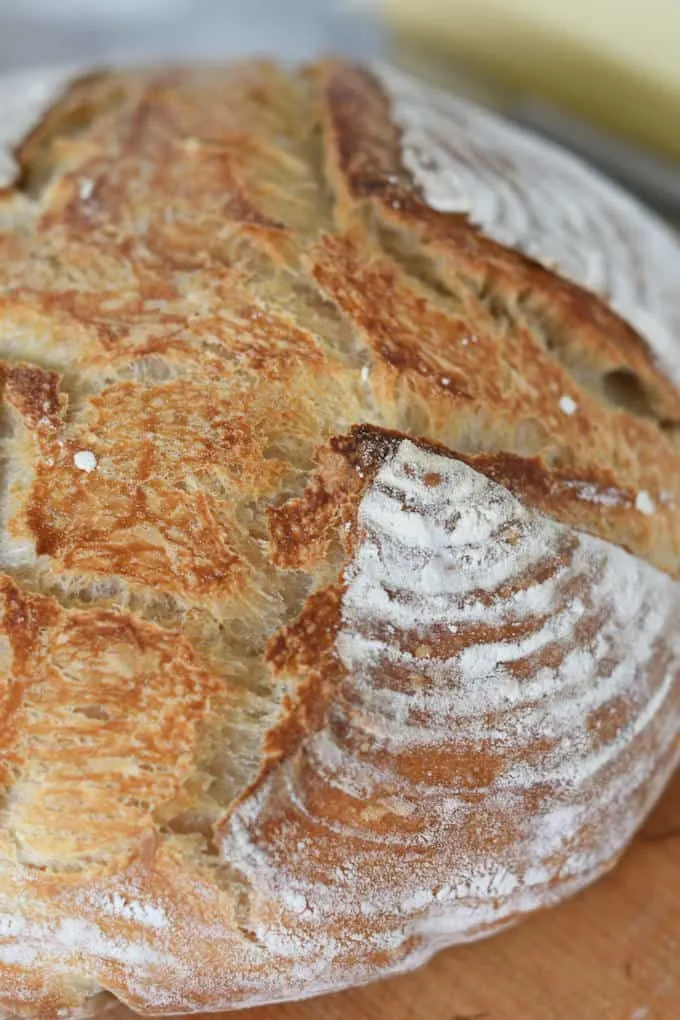
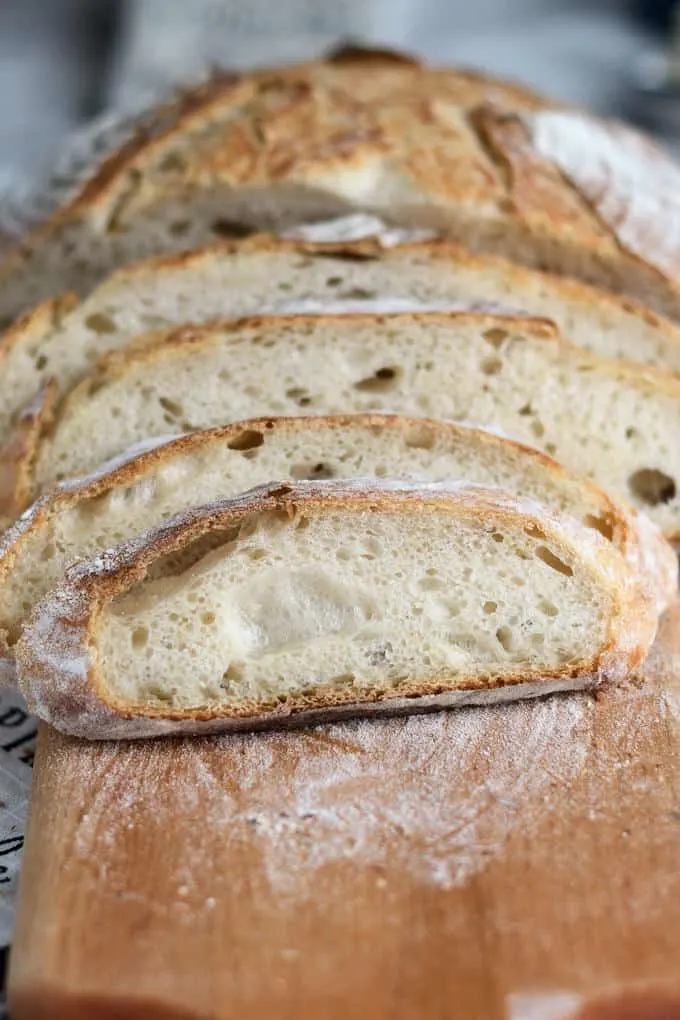
I know you hate to throw away that sourdough discard. Check out these recipes that use sourdough discard.
If you want to make a loaf with the crispiest crust ever, try making Sourdough Semolina Bread.
If you love this recipe as much as I do, I’d really appreciate a star rating and a quick comment. Ratings and comments help my recipes show in search results. Thanks!
Artisan Sourdough Bread Recipe
Ingredients
- 8 ounces active sourdough starter (1 cup (100% hydration))
- 8 ounces warm water (1 cup)
- 12 ½ ounces unbleached all purpose flour (2 ½ cups, see note)
- 1 ½ teaspoons table salt
- Rice flour for proofing basket
Instructions
- Combine 8 ounces active sourdough starter, 8 ounces warm water and 1 ½ cups (7 ½ oz) of the flour. Mix with the paddle on low speed until it forms a thick batter. Cover the bowl and set aside for 30-60 minutes.
- If using a stand mixer, change to the dough hook. Add 1 ½ teaspoons table salt and the rest of the flour and mix until the dough begins to form a ball around the hook. If mixing by hand add the flour using a wooden spoon and/or a plastic bowl scraper. This dough is quite sticky.
- Place the dough into a lightly oiled bowl, turn once to coat the dough. Cover the bowl and set it aside at room temperature.
- After 60 minutes uncover the bowl, lift one side of the dough and fold it into the middle of the dough. Repeat with the other three sides of the dough then flip the dough over. You're basically turning the dough inside-out to redistribute the yeast. Cover the bowl and every hour or so repeat the procedure.
- After about 2 hours the dough should be lively, elastic and airy. If the dough is still sluggish give it another hour or two at room temperature. Cover tightly and refrigerate overnight.
- Remove the dough from the refrigerator and dump it onto floured surface. Without kneading, use your cupped hands to form the dough into a smooth ball. Cover lightly with a kitchen towel or plastic wrap and let the dough rest for 20-30 minutes. If the ball flattens during the 20 minutes fold it onto itself and form the ball again. This step will help you check if your dough is elastic enough to help it’s shape during the final rise and baking.
- Uncover the dough and knead 1-2 times. Reshape the dough into a smooth ball and place the dough into a well-floured proofing basket (I use a mix of ½ rice flour and ½ all purpose flour in the basket) or directly onto a sheet of parchment paper.
- Cover the dough and leave in a warm place until it's almost doubled in size and it springs back slowly when poked, about 2 hours depending on the room temperature and dough temperature. Meanwhile, preheat the oven to 425°F. Place a Dutch oven with a lid into the oven to preheat.
- If the loaf is in a proofing basket, place a sheet of parchment over the dough and gently flip it over. Use a single edge razor or very sharp knife to cut a ¼" deep X across the top of the loaf. Remove the preheated pan from the oven and remove the lid. Use the parchment to lift the loaf into the Dutch oven.
- Replace the lid on the pot and slide it into the oven. Bake for 20 minutes. Remove the lid from the Dutch oven. The loaf should be well risen and pale in color.
- Continue baking another 20 minutes until the loaf is nicely browned and beginning to crisp. Remove the pan from the oven. Use the parchment to lift the loaf out of the pan. Use the parchment to place the loaf directly onto the rack in the oven. Bake another 5-10 minutes until the loaf is deeply browned and very crisp. Total baking time is about 40-50 minutes.
- Cool completely on a wire rack before slicing.
Would you like to save this recipe?
As an Amazon Associate and member of other affiliate programs, I earn from qualifying purchases.






Would this recipe with adding King Arthur pizza dough flavoring and pizza flavoring? I want to try an inclusion loaf.
Is the pizza flavoring a spice mix? I don’t see any reason you couldn’t add a spice mix.
Yes, it is a spice mix. Thank you!
This is my first sourdough loaf attempt, and it turned out great! Your instructions were amazing.
I’m trying this recipe for my first time.
My starter was feed this morning and used at its peak.
I also noted, as did another commenter, that when I did the add in of the second amount of flour (1 cup) and mixed it in it did not form a ball but a very shaggy mess. I mixed it fully and dumped it into my lightly oiled bowl hoping for the best. I know the stretch & fold does help build firmness.
I’m also wondering what you consider “room temp”? My house is at 68° F. I have generally put my mixtures into my oven, with the light, on to create a warmer space. I’d that too warm. It gets quite warm in there which really surprised me.
Hi Cathy, My kitchen is quite cool at this time of year. I have a few ways of keeping my sourdough warm enough. I will sometimes turn on the oven just long enough for the heating element to come on, then turn it off. It warms to maybe 75-80F and it’s perfect for keeping the dough. The dough will should become more cohesive during the fermentation and from the folding. If you look at the first process photo in the post you’ll see that the dough in the bowl with the hook is quite sticky. Do you have a thermometer in your oven to track the temp with the light on? Maybe you can toggle the light on and off if you think it’s getting too warm.
Love this recipe, it’s definitely my go to! Thank you!
Eileen, I have a few questions on your Sourdough Bread Recipe.
I have made it, perhaps, 10-12 times and always get a delicious loaf of bread. This week, after refeeding my starter, I made another loaf and had the following questions about the process.
I have noticed that when doing the second mix that the dough begins to form a ball on the dough hook but before the flour has been incorporated, and once the flour is, the dough is not a ball on the dough hook, but a puddle in the bottom of the mixer bowl. I need to use a spatula to move it to the lightly oiled bowl as well as turning the dough to coat it.
The dough seems to firm up, somewhat, when I stretch and fold it, but it never looked like your photos. It was very loose and didn’t have any structure to speak of. It was not holding it’s shape when forming it into a ball prior to placing in the proofing basket. The final loaf looked flat although it was dense with a nice flavor.
I am asking this because I followed up this loaf with my first Semolina Sourdough Bread recipe and had a quite different experience. The dough was so much more dense and easier to work with.
I’m wondering if the additional ¼ cup of flour could be the answer. I know that the semolina flour probably adsorb water differently than All Purpose. Is that what could make the difference?
Thank you for all your fantastic recipes. I haven’t found a 4 star one yet. They all seem to be 5 stars to me.
Hi David, are you saying you’ve always had this experience with this recipe, or just this time? The semolina flour is higher in protein and will absorb more water than the ap flour in this recipe. Are you weighing your ingredients? If you are using cup measurements be sure to use the “dip and sweep” method for filling the measuring cup. Read more about measuring baking ingredients here. Is your starter 100% hydration and fully active when you mix the dough? Are you using unbleached AP flour? You can make this recipe using bread flour for a tighter dough if that is easier for you to work with.
Eileen, I do measure out everything. I use King Arthur Unbleached AP flour in the red bag. I have to say that it happens pretty much every time, but this last time it was more noticeable, especially after I had the experience with the Semolina Sourdough recipe.
My starter is 100% hydrated. I weigh out the starter, flour and the water (4oz. each), so I’m going to assume that is what you mean by 100% hydrated. I started back at the beginning several years ago watching the starter grow in the container and waiting till it dropped back to it’s previous level, but grew to understand that I needed to use it right after it reaches it’s peak, and that is the condition I it was in for this latest loaf.
I assume that it could be that the room temperature was a little cooler than normal.
I just discovered that my KitchenAid range has a Bread Proofing setting that I think is 100 degrees. I would think that is a little to warm. Your thoughts.
Please understand that the bread comes out delicious. I’m just wondering if it’s me or the conditions I proof it or something else and I hope this might be helpful for some other beginning bakers.
Thanks for your comments.
Proofing at 100F is fine, especially for the final proof. Yes, I get the best results when I use my starter just as it has peaked. Are you putting the dough into the fridge overnight? I find the chilled dough easy to shape.
Yes, I put the dough in the refrigerator over night and that does seem to help, but still too loose to be able to hold. It’s a quick transfer from bowl floured surface, forming into ball, repeat then again a quick transfer into the banneton to proof. I’m able to use the lame to cut 1/4″ cuts in the surface before baking.
The bread looks good, although a little less rise than I would hope, and tastes great.
I think i’ll try the Bread Proofing setting on the range next time.
Thanks again for your comments.
Your directions in step 1 say to use 1 1/2 cups of flour but then below that you give the entire 2 1/2 cup amount in grams. I wasn’t paying attention and added the 354 g all at once so now all I would have left to add in step 2 is the salt. This should be updated to not cause confusion to beginner bakers.
Do you think the loaf will still turn out or do you think there will be an issue with adding it all at once?
The bread should be fine. I’ve updated the card.
Your recipes for sourdough bread are the only ones I’ve ever had good luck with…starting during the shut-down days of 2020. I almost lost them but remembered Baking Sense tonight. My loaves always turned out Beautifully when I followed your directions.
Thank you!
I’m wondering why you changed this recipe? You used to have us turning and folding the dough every 30 minutes, then every 60 minutes, adding up to 3 hours. Plus a few other changes I noticed. Just curious. I’ve always loved this recipe – my bread has always come out perfect.
Hi Laurie, thanks for the question. I’m am always trying to improve my recipes and I’ve been tweaking the instructions in all my sourdough recipes to try to convey that it’s not an exact science set on an exact schedule. So I’ve been giving slightly looser instructions because the dough will behave differently depending on your environment and your starter. Sometimes the dough may be ready in 2 hours and sometimes 5 hours. If your bread has been coming out perfect then definitely no need to change your procedure.
@Eileen Gray, thanks!
@Eileen Gray, my dough took nearly 48 hours to be ready, partly because our house sits at 69 degrees, partly because I didn’t turn it as often as I was supposed to with kid distractions. I also think my starter was somewhat sleepy with me returning from a trip prior to me doing this.
What using minimal starter, a slow bulk ferment, and a cold second proof is that it results in an incredibly amazing flavor profile. After taking a side road this past year that’s been fraught with frustration, I’ve come back to this simple, basic recipe where I started in order to refine mixing technique, bulking time, hydration and oven spring with the relatively weak, organic, non-hybridized flours that I use that only contain around 10-12% protein.
Even a loaf having less than an ideal height and having a bit tighter crumb is still soft and flavorful.
Thanks Eileen. Now please pass the butter.
A note for those who don’t already do so – weigh your flour and water. You may realize improved and more consistent results. So, do yourselves a huge favor; buy a scale and click the ‘metric’ button.
I make 7 loaves at a time. Some of my loaves do not rise as much as I’d like but the holes, taste, crust is good. What would cause some loaves to rise less than others?
Do you make a 7x batch or split the dough into 7? So many factors could affect the rise. Ambient temp, dough temp, condition of the starter. Do all the loaves comes from the same batch of dough?
@Eileen Gray, 7 times the batch but it is a recipe from Kristen’s fool proof so not yours.
I made your rolls and I’m very happy with them so will also try your bread recipe. I struggle with the poke test and knowing when processing is ready for fridge. It’s usually around 7 hours from when I add the leaven. Thank you for your recipes and help.
HELP?? how much more flour do you use. It says”add the rest of the flour”. How much?
You start with 2 1/2 cups of flour as listed in the recipe. In step one you add 1 1/2 cups. So there is 1 cup left. That is the rest of the flour.
@sherrie, I did the same thing when I first read through the recipe. I like the way she worded it. I am just too used to reading other mediocre recipe formats.
My first fully successful sourdough. Very tasty. Perfect crust!
My thoughts:
I believe that after mixing it, one might do the stretch and fold process every 20 minutes, then resting covered over two hours.
Further, this is a very wet dough and, depending on the time of year and your flour, might be impossible to handle. My flour likes 65% as a maximum hydration level.
Further, this makes a smaller loaf. Most other recipes call for 500g of flour and the amount of water necessary (65-75% hydration) to make the dough workable.
One last note, if you’re not in any hurry and are going to cold proof for 8-48 hours, use half or less of the starter – some use only 50g. 300g (1-cup) of 100% hydrated starter is a lot but I’m giving this amount an initial try. I use a very active rye starter and it’s capable of doubling in 2 hours and ready to use.
I’ve already had to adjust my flour amount up to almost 400g to make it workable so keep that in mind.
Sourdough baking has a learning curve and failures along the way. however, even those failures are flavorful and can be used as is or to make breadcrumbs or croutons. Save and use or dry your discard. Discard makes a good starter base to give away. It will spring back to life in 2-3 days or 4-6 feedings. Use fine rye flour for the best sourness and strength.
One last note: It’s not necessary to maintain a quart jar of starter like shown on many blogger sites. Maintain a 1/4 cup or less to use as an inoculation two days prior to baking. It will be ready to use and the discard minimal. Once well established, you can feed it once every two weeks or so. It will perform well for you without the hassle. Perfectionists claim to even take theirs along on trips. Good grief – get a life.
Have fun with this process and don’t give up. It is an edible art.
so you put in fridge overnight? not on the counter?
Yes.
Hi!
I have maintained this starter for a couple year’s and recently started baking bread weekly. The last few loaves have not risen much and are pretty flat. Any ideas on what is wrong? Do I need to do a new starter?
Thanks for any help you can give!
@Karleen, You may be over/under proofing it. I have similar problems when I hurry and do not allow it to bulk ferment to double on the counter before shaping then proofing it in the fridge again to double.
Slashing it deep and then baking in a Dutch oven traps the steam and keeps the crust soft and allows it to expand and spring thru the slashes. I spray mine well with water after slashing and just before putting the lid on the preheated Dutch oven. Bake it covered (don’t peek) for at least 40 minutes, take the temperature in the center (203°F). If ready, then bake it uncovered for 3-4 minutes until browned as desired or pull it to cool.
If you can’t figure it out, go back to your beginning method used and evaluate what you’re NOT doing. I found my waywardness that way.
How do you recommend thawing/reheating the loaf after it’s been baked?
If it’s a whole loaf I would let it defrost then rewarm it in a low oven to recrisp the crust. If it’s been sliced you can thaw slices as needed and either use them toasted or untoasted.
I am unable to find rice flour, will corn starch work?
Regular ap flour will work, just use enough so the dough doesn’t stick to the basket.
Holy mackerel
So many adds I could not read the recipe.
Bye
Bye!
Do you really need rice flour can you use some other flour vicky
Rice flour is a little gritty so helps prevent sticking. But as long as you flour the basket well-enough you can just use ap flour.
@Eileen Gray,
I didn’t even bother to look for rice flour, so I figured: grind some rice in my spare coffee grinder. Works. Does the job 🙂
Hi, I’m loving this recipe and your site! For the dough recipe measurements, are you weighing the ingredients or using measuring cups?
I always personally use weight measure. But I provide both for my readers. I convert my recipes to volume measure based on my own conversion table.
Do you have any tips for making multiple loaves and how to alter timing so one doesn’t sit out proofing for an extra hour? I have found it is overproofing the second loaf so I am not sure if I should accelerate the whole thing and only proof for an hour to an hour and a half, or delay the second in some way. I have been playing with putting the second in the fridge to proof slower a bit as the first loaf cooks but curious what you do.
Thanks,
Nick
I think your idea of refrigerating the second loaf to slow it down is a good one. That’s what I would do.
@Nick, What do you mean by “over proofing?” What happens, and what harm does it do?
Thank you so much for your recipes!
I have been baking with my starter for a while but they have never been so perfect.
I have even achieved the coveted big holes!
🙂
I was just given sour dough starter by an actual baker\neighbor. I m not sure where to start as far as making sour dough bread. I ‘ve made bread before but not sour dough. Any advice? Thank you.
If you read this post about making a sourdough starter and this post about feeding a starter it will give you some background information. Sourdough is a huge topic and there are a million ways to work with sourdough. My best advice is to just bake, bake, bake and be patient with yourself.
@Eileen Gray, Similar situation got a starter from a friend and super excited to use it. Checked out a bunch of your articles and they have been a huge help, thank you!
Started with 1.7oz of started from her and now have a ball of dough forming to bake tomorrow and have 8oz I just fed to get a nice batch to play with.
Can’t wait to try a bunch of your other recipes with the discard and such!
Have fun!
I really love your recipes and have had good results with many of them. I have a couple questions for this one. First, I used 1 cup of whole wheat flour, which of course produced a denser but still good loaf. Do you think kneading the dough for five minutes would produce more rise? Also, would this recipe work for hard rolls? I want to add that other so called sourdough recipes I find online use commercial yeast and that is not sourdough!
You can knead the dough for a couple of minutes to develop the gluten. When I was testing my Sourdough Baguette recipe I often switch between kneading and no-knead methods. I personally like the texture of the dough with a few minutes of kneading.
@Eileen Gray,
Thank you, I think the kneading helped a bit. Thanks also for the link to the baguette recipe!
I’ve made several of your recipes and love them, but am having trouble with this one. If after the step #6 the ball won’t hold shape on the second try, what should I do?
I love the way the Dutch oven works,but is there any way to get a round loaf using this recipe?
By round do you mean higher and almost a ball shape?
@Eileen Gray,
Yes. Is it possible to keep it from flattening out?
Well, you need to make a super tight dough ball with very strong gluten so the bread rises up without flattening. You could try adding a little more flour. That will tighten up the dough but the crumb will also be a bit tighter.
Love this recipe so much. I wonder, can I can put this dough in a loaf pan & bake it?
Sure.
@Eileen Gray, do I bake it at 425 and for how long?
425 should be fine. I can’t say for sure since I haven’t tried it, but I’d guess it will bake a bit faster. You probably want to lightly grease the pan since there is no fat in the dough. Also, depending on the size of the pan, I would make sure not to fill it more than about 1/2 way with the unrisen dough. Any extra dough could be baked as a mini loaf on a pan.
Hi I fed my starter yesterday used a cup after it had doubled fora loaf and put the rest in the frig. It grew a bit more overnight and still looked bubbly ,active and it would float
still in the morning. Do I still have to re feed today before using?
I find that the bread is always better with a starter that’s been feed recently and is at the peak of activity. You could probably get away without feeding, but the dough won’t be as lively.
I am new to sourdough and really enjoying your tips and lessons. Question, do I have to discard when I feed?
You don’t have to, but if you don’t at some point you’ll end up drowning in sourdough starter because it will grow exponentially. If you keep a 12oz starter and add 12oz water and 12oz flour to feed you’ll have 36oz of starter. If you feed that without discarding you’ll have 108oz of starter. Even if you keep a small starter, it will grow pretty quickly. But keeping a small starter does mean much less discard each time, 2oz vs. 8oz discard. The drawback is that you do have to do 2 feedings each time you want to bake using a small starter. Don’t forget that you can also bake with sourdough discard.
What size Dutch oven do you use for this recipe? Will a 5.5 qt. Le Creuset work?
I use a 7.5 qt Dutch oven. The bread almost fills the pot, but there is a bit of room. My Dutch oven is 11″ across, to give you a comparison.
When I put it in the fridge overnight, how long will it be okay to leave it in there before continuing? I can’t get to it until about mid-afternoon to do the shaping and final prove – will that be too long in the fridge then?
Once you refrigerate the dough you can leave it there for up to 2 days. Just make sure it’s well wrapped so the surface doesn’t dry out.
I’ve made this for the first time yesterday/today. It looks great and I’m going to try it for dessert tonight.
I love your explanations! Thanks so much. Can I make this recipe using bread flour and would I need to make any changes?
You can use bread flour. Bread flour will absorb more water than ap flour, so maybe hold back a little flour and add it at the end if you think you need it.
Your recipe says 21/2 cup of flour but buy you put use 11/2 flour only..I am confuse.can I use spelt flour .
The first 1 1/2 cups goes in step 1, and the remaining flour are added in step 2.
I must use non-wheat sourdough starters. I have used a rye sourdough starter (1 cup) and also have used a spelt sourdough starter (1/2cup). Did add in some white rice flour to the doughs.
Very difficult managing the doughs. Get good results but the final loaf is usually denser with little air pockets. I have tried adding baking powder 1 to1-1/2tsp per 150g flour with slightly better success.
Any suggestions to get either recipe to be a lighter loaf?
Do you use wheat flour for the dough but not for the starters? I would guess the dense crumb is due to the type of flour no having enough gluten to support the dough.
I have been looking for a sourdough bread bowl recipe, but unfortunately can’t find one on your site. Your sourdough recipes are the only ones that work flawlessly every time (thank you!!), so I am wondering if I could use this recipe to make a few bread bowls by dividing the dough into 2-3 small rounds after the overnight proof? What do you think??
Yes, I think you could make 3-4 smaller boules (round balls) and bake them to be bread bowls.
Thank you for your reply, Eileen! I have 4 small rounds doubling right now before it’s bake time. Hoping they turn out! 🙂
Great! You can post a photo and tag me on social media, if you do social media.
Can you make this recipe printable
Sorry, there is a print button on the recipe card. Some of the color setting got switched and the text was displaying white on white so it wasn’t visible. It’s been fixed. Thanks for the heads-up.
Hello! Not bad for a first try but the dough was limp and didn’t hold an upright shape. What should I change?
And, it burned underneath. was it just that the rack was too low in the oven?
If the dough seems limp, make sure you’re using a starter that is at the height of activity. A slightly older starter is more slack than a fresh starter. Also, make sure your starter is 100% hydration and that you are weighing your ingredients. As far as the bottom burning, you could put the pan higher in the oven. Also, I recommend keeping an oven thermometer in the oven to monitor that the temperature is correct.
Hi Eileen!
I am at step 6 and it is definitely not holding its shape. Now what? Knead and let rise longer?
Thanks.
I know it’s been a while so hopefully you worked it out. If it doesn’t initially hold it’s shape you can push the dough back and forth between cupped hands to form a tight ball and give it another few minutes it see if it tightens up.
Hi there,
If I mix the dough in a dough mixer for a couple minutes/until it forms a ball on the hook, do I also have to do the series of stretch & folds after it?
Or, does the dough mixer step cut out the need to do the stretch & folds?
I do both because I like to monitor the dough as it’s fermenting. Will the dough be ok if you skip the folds? Yes, I think so.
Getting this recipe to work is now my life’s mission! I’ve tried it 4 times now and I have the same issues as Kim who posted in June. I start the recipe when my fed starter looks to be at its height before collapsing, which is about 8 hours in my case (half rye flour half all-purpose flour). The dough seems to be getting more lively and airy in the early steps of the recipe, until the step when I put it in the refrigerator overnight. After coming out of the fridge, it does not hold its shape when I make the ball and wait 20 minutes, even if I do that for an extra 20. And it doesn’t rise in the proofing basket or during baking. Great tasting result. But just very, very dense.
Any suggestions? I’m wondering if I should try using the starter 2-3 hours after feeding (like was mentioned before), but my starter is not yet fully active by that time.
Hi Cris, with this recipe it is all about controlling and starter. Have you tried giving your starter 2 feedings before making the dough? Take the starter out the night before and give it a feeding, then again first thing in the morning, give it a few hours to become active and then make the dough. Double feeding my starter gives me good results. This works really well if you keep a small starter since a small starter requires two feedings before you have enough to bake with. Also, if the point where you loose the dough is the overnight refrigeration, you can bake the bread on the same day you make the dough. Shape it after the fermentation and leave it at room temp to rise. Then bake. Good luck!
Thanks Eileen! I’ll give it another shot.
There is nowhere near enough flour in this recipe.
How can you add 140g flour to something described as a ‘batter’ and expect to end up with anything resembling a dough that is foldable within 30 mins???
Yea I agree, it is much too wet to handle, i had to add more flour.
How long do you knead the dough in the mixer? I have been kneading for about 15 ins and the dough is still super wet.
You don’t need to knead it at all. You can just mix until the dough gathers on the hook a bit. The gluten will continue to develop as the dough ferments. It is a wet dough. That’s the nature of this type of bread. If you want to knead for 4-5 minutes you can. I do it both ways with minor differences. Kneading a couple of minutes changes the texture a bit. Although it’s always hard to say with sourdough since there are always variations. Again, the nature of this type of bread.
I have tried a couple sourdough recipes and none of them have been inedible but they were dense and didn’t have the perfect airy sourdough texture. So trying this recipe I was sceptical but I read through everyone’s comments and began the two day process. I also sorted my starter out using your recipe increasing its total amount to 12oz and used the discarded starter in your sourdough brownies recipe (Which I would highly recommend they were delicious). Like some of the other comments said I found my dough to be quite wet, but it was still manageable, next time I would definitely add a bit more flour as it did stick to my wooden basket and lost it’s shape a bit when I put it in the Dutch oven. This also meant that I struggled to score it, but I put it the oven and hoped for the best. When it came out it looked a little sad as it had lost its shape on one side from being too wet but when I sliced into it it was my dream sourdough. The crust was crisp and crunchy the air bubbles filled the bread and it had the mist amazing taste. I would never use any other recipe now it was incredible thank you so much. One thing I would like to know is can I add some whole meal flour in to turn it into a brown loaf or what that change the whole texture?
You could definitely add some whole grain flour. I would start with 1/4 of the weight with whole grain and see how you like it. You can gradually add more to get to the texture you like. As far as the dough being wet, that is on purpose. A high hydration dough (wet) means the crumb will be moist and airy and the crust will be nice and crisp. It does take some practice to handle a wetter dough. The hours of fermentation and folding help develop the gluten which allow the bread to hold it’s shape. Use a light hand when working with the dough and keep the surface floured. When you’re getting ready to shape the dough make sure to do the step where you shape the dough into a ball and set is aside for 20-30 minutes. This will tell you if your bread has enough elasticity to hold it’s shape. If the ball flattens during the 20 minutes fold it onto itself and form the ball again. See if this helps it keep the shape. You do have to generously flour the basket for the final rise.
Hi There,
I have a few comments!
1. further to Abby’s comments, I find the same issues. I weigh everything when baking the bread or feeding the starter, so I don’t know if there is half and ounce left on the spoon or in the bowl? I scrape as much as I can but always come up short. When my starter is left with 3.5 oz. (or whatever it is), I just add 3.5 oz of water and flour to ensure the right balance – but then it should be back on track the next day when I weigh out the 4 oz to continue with feeding. It still baffles me.
2. This is the third starter recipe I’ve tried, the first two were complete fails. I’ve seen much success with this method (I think weighing the ingredients is a game changer) and have baked a number of lovely loaves and tried the pretzels! Everything has been excellent! Thank you Eileen for taking the time to post and answer everyone’s questions, you have truly made this sourdough bread baking adventure a fun learning experience and I think sourdough will be a staple in my house going forward. It’s so easy to make this bread, and it’s delicious! Thank you!!
Yes, I could see how you’re left with 3.5 oz instead of 4. You could certainly loose a bit on the spoon, etc or maybe even the accuracy of the scale. Abby mentioned that once she had just over an ounce left. That is harder to understand how it happened. But, like you, if I’m left with 3.5 instead of 4 oz I don’t sweat it.
@Eileen Gray, i just put my bowl on the scale and measure directly into the bowl, no scraping needed
I grew my own starter and have just started making sourdough bread this spring. This is the 4th and best recipe I have tried. It turned out so perfectly! I am going to try your sourdough rye recipe next.
Great bread, thank you! I am trying to figure out why when I measure out 8 oz of starter for the recipe, I do not have 4 oz left over to put back in the fridge. This has happened to me both times. The first time I had just over an ounce left, and this time I have 3.5 ounces. Does it have to do with when I take the starter? The first time I think I used the starter a bit late, it had gone a little watery. This time I think I got it when it doubled and it was much thicker.
As long as you are weighing it shouldn’t matter what the texture of the starter is. That is why weighing is the most accurate way to measure. 8 oz is always 8 oz. I would say it might be the way you are feeding the starter. If you’re not weighing for the feedings the starter will have a different weight to start with.
Thank you. I always weigh everything at every step – which is why it is so odd. Conservation of mass should apply. I can’t figure it out.
Yes, that is very strange. If you start with 4 oz of starter and add 4 oz of water and 4 oz of flour you will have 12 oz total no matter how much the starter rises or falls. When you say you are measuring 8 oz do you mean you are measuring with a scale, not a measuring cup? 8 oz of liquid measure can vary, but 8 oz on a scale is 8 oz.
Measuring with a scale! It is very odd indeed!
Hi there. I’ve tried this recipe 2 times now and second time better than the first, however my bread doesnt rise. It’s not rising much during step 8 or in the oven much. It comes out tasting good and sour but its dense and not airy at all. Any thoughts on what I am doing wrong? I have pictures but not sure how to share.
Sounds like maybe your starter is not active enough. Do you feed with within a couple of hours of mixing the dough? Is the dough nice and light after the long fermentation?
I am having a similar issue. My starter rises well, but the dough just isn’t rising after the overnight fermentation or in the oven. Four times I have tried – first was awful, send and third gradually better, and fourth terrible. I have left it out for hours in the morning to try and get it to double in size, but it barely rises at all.
How does it do during the fermentation? Is is changing from sticky and slack to bouncy and lively? How long before making the dough are you feeding your starter?
Hi Eileen! Thank you so much for sharing! I am in the beginning stages (day 4 and so far so good!) On my starter. But noticed in the recipe it calls for table salt. In your opinion, If I use sea salt or kosher would I use an equivalent weight or same measurement as the table salt?
If you use something other than table salt you should weigh the salt. The same volume of larger-grain sea salt or kosher salt will weigh less than table salt. I use table salt for baking because any nuance in flavor from sea salt or other specialty salts would be lost. If you don’t have table salt in the house use what you have, but you’ll need to weigh to account for the size of the salt grain. Here’s a post all about salt which includes a table of different salts and how the weight can vary.
Learning how to bake sourdough bread from your website has been so gratifying and fun these past few months..working from home.
I will never enjoy store bought bread again after having mastered (a little) your delicious bread recipes. Thank you.!
Melissa
Thanks so much, Melissa. Once you get the hang of it you realize that baking bread isn’t really that much work. I hope you keep it up when you go back out to work away from home.
Hello there, I made my starter and the dough but I find the dough to be extremely wet and after the refrigerated proofing my dough more resembles a pancake than a ball on my floured surface. I feel I may have made my error by not weighing the starter going into the recipe, I just measured out one cup. My starter had already fallen at that point as well, it was a bit runny. Is there anything I can do to save my hopeful rustic loaf? Knead more flour into the dough?
I’m enjoying this challenge. I’m a seasoned chef but this is my first time baking sourdough from scratch and I welcome whatever learning curves are coming my way. Thank you for the recipe compilations. I look forward to many sourdough adventures.
This is a much wetter dough than a regular yeast-risen dough. The wet dough makes a light and moist crumb that is typical for this style of bread. Did you weigh any of the ingredients? If you used cup measures for the flour you could also be off there. You can certainly knead in more flour to make the dough manageable. Generally, after the fermentation and time in the refrigerator the dough is more cohesive. If you just can’t work the dough I would knead in more flour and give it some time to see how it does.
First attempt at this recipe……it did not raise at all. ??
I’ll need more information before I can trouble shoot. At what stage did it not rise? During fermentation, overnight, in the oven?
I have gained a lot of confidence just from using this recipe several times. I upped the salt to 2 1/2 teaspoons just for our personal taste, and tweaked the “twang” factor by feeding my starter with rye flour every other time. Thank you so much for making this recipe available and for providing the pictures of the different steps. Love it!
You’re very welcome.
If I wanted to could I make this into raisin bread?
You could knead in some raisins, but for my taste it wouldn’t be the best base for raisin bread. I would use White Sandwich Bread with a soft crumb. But of course that’s a matter of taste.
I’ve been experimenting with sourdough during our lockdown. So far everything has been edible, even if some of it needs work. I hadn’t done a boule. I followed the instructions, easy peasy and straightforward for which I thank you very much, and I got a great result. I used a bit more flour than asked for but it was all-purpose. No bread flour to be found around here, lol, everyone is baking! What difference would that make? Pinterest won’t let me post pictures. I’d love your opinion of the crumb.
I use all purpose for this dough so no bread flour is no problem. You can post a photo on either Facebook or Instagram and tag me there. Pinterest should let you post a photo onto my pin for this recipe. Folks do it all the time.
Hi Eileen,
If you want to skip the overnight refrigeration, what do you do between steps 4 and 5?
Thank you,
Debbie
Do everything exactly as written except once the dough is finished with the long fermentation you go right on to shape the dough for the final rise and bake.
Awesome! I kinda figured it out, but wanted confirmation.
Hi- what if I have a starter that is 2:1 (ex: 1/2 cup flour to 1/4 cup water)? How would I adjust the recipe? Thank you.
1/2 cup of flour weighs about 2.5 oz and 1/4 cup of water weighs 2 oz. So you’re not far off 100%. I would think that you’d be ok using with the recipe as written (still use 8 oz of starter). If anything, your starter would be a little thicker and this is a fairly wet dough.
It worked out great! I left a review – thank you for your help.
Would you change any proportions if using bread flour?
Bread flour will absorb a bit more of the water than ap flour does. The dough will be a little less wet than it is with ap flour and the final crumb could be a bit tighter. But honestly, you’ll get a great loaf of bread using bread flour.
Love the instruction and the video! Thanks!
Thanks!
Was looking for a straightforward recipe, using the dutch oven and this one seems to have worked for me. My second attempt ever turned out great. Thanks.
That’s great, Michelle!